

That slow drip under your handle, the wobble when you turn it, the finish that’s worn down to bare metal — at some point, every kitchen faucet starts asking to be replaced. The good news is that swapping it out is one of the more approachable plumbing jobs you can take on yourself. Most homeowners get it done in an hour or so, with tools you can pick up at any hardware store for under $50.
This guide walks through the whole process: what you’ll need, how to get the old faucet out, how to get the new one in, and the mistakes that turn a simple job into a Saturday-long headache.
Do You Actually Need a New Faucet?
A faucet that’s dripping, hard to turn, or losing water pressure isn’t always a sign the whole unit is shot. Sometimes it’s just a worn-out cartridge or a degraded O-ring, and those are cheap, quick fixes on their own.
But if your faucet is more than 15 years old, has visible corrosion around the base, or you’re just ready for a style upgrade, replacement makes more sense than another round of small repairs.
Upgrading your faucet is one of the easiest ways to refresh your kitchen. If you’re giving your space a bigger makeover, see our guide on how to make oak kitchen cabinets look modern
What You’ll Need
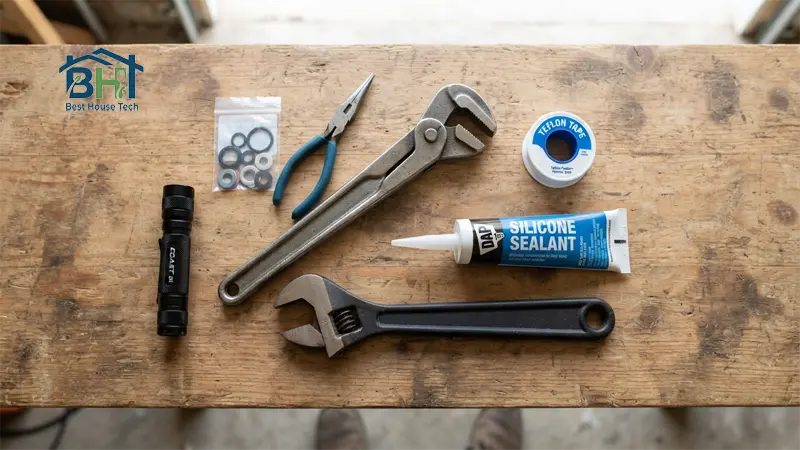
Most of this is standard household hardware, and none of it is expensive:
- New kitchen faucet (check your sink’s hole configuration before buying)
- Adjustable wrench
- Basin wrench (this is the one specialty tool worth owning; it reaches the mounting nuts a regular wrench can’t)
- Plumber’s tape (Teflon tape) (use only where metal-to-metal threading requires it)
- Plumber’s putty or silicone sealant, if your faucet calls for it
- Bucket and a couple of old towels
- Flashlight
- Channel-lock pliers (optional, but handy on stubborn connections)
Pro Tip: Before you buy a faucet, look under your sink and count the holes — most kitchen sinks have one to four. A single-hole faucet can go into a three- or four-hole sink with a deck plate to cover the gaps, but it doesn’t work the other way around. Match your new faucet to what you’ve already got, or plan on covering extra holes.
Step-by-Step Guide to Replacing Your Kitchen Faucet
Step 1: Shut Off the Water
This is the step people skip when they’re in a hurry, and it’s the one that turns a tidy project into a flooded cabinet.
Look under the sink for two shut-off valves, one for hot and one for cold, and turn both clockwise until they stop. No shut-off valves down there? You’ll need to close the main water valve for the house instead.
Once the valves are off, turn the faucet handle on and let it run for a few seconds. This releases the pressure sitting in the lines so you’re not fighting a stream of water once you start disconnecting things. Slide a bucket underneath and lay towels around the base — there’s almost always a little residual water waiting to surprise you.
If working under the sink leaves your wooden cabinets dirty or greasy, check out our guide on how to clean wood kitchen cabinets without damaging the finish
Step 2: Disconnect the Old Faucet
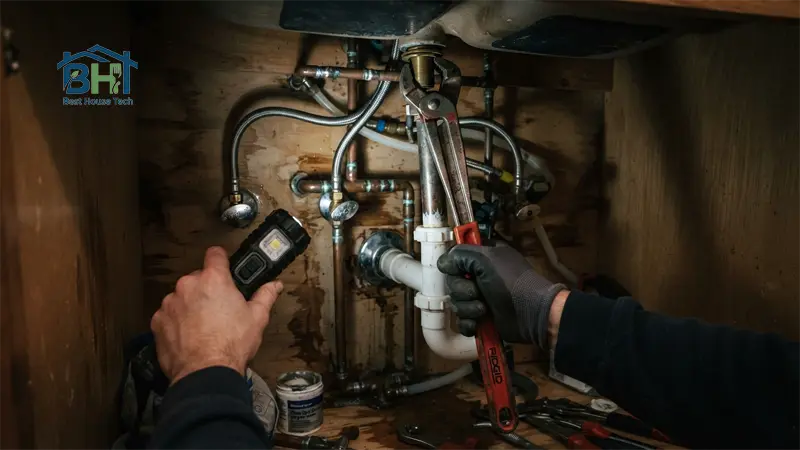
With the water off and the area prepped, it’s time to get the old faucet loose. Using your adjustable wrench, disconnect the supply lines where they connect to the shut-off valves. Have your bucket ready — a bit of water will still trickle out.
Next comes the part most people find frustrating: reaching the mounting nuts that hold the faucet to the sink from underneath. This is where a basin wrench earns its keep. Its long handle and swiveling jaw are built specifically for that awkward, cramped space behind the basin where a regular wrench just can’t get an angle. If the nuts are corroded or stuck, a little penetrating oil and some patience go a lot further than force. If you’ve never used one before, check out this quick guide on how to use a basin wrench step-by-step to navigate tight sink spaces easily.
Once the mounting nuts are off, the old faucet should lift right out from above the sink. If it’s stuck to old putty or built-up grime, work it loose gently rather than prying hard enough to scratch your countertop or sink surface.
Take a few minutes here to clean the area thoroughly — old putty, mineral deposits, and grime need to go so the new faucet can sit flat and seal properly. Skipping this step is a common reason new installations leak right out of the gate.
While cleaning up grime around your sink, if you also have stained cookware nearby, learn how to clean burnt stainless steel cookware naturally
For cleaning stubborn mineral scale and grime around your sink using safe household ingredients, see our tips on using baking soda and vinegar for natural kitchen cleaning.
Step 3: Install the New Faucet
Check the manufacturer’s instructions that came with your new faucet, since mounting hardware varies more than you’d expect between brands. In general, though, the process looks like this:
- Place the gasket or deck plate: If your faucet uses a rubber gasket, set it in place over the holes. If you need a deck plate to cover extra holes, apply a bead of plumber’s putty or silicone underneath it first, then center it over the openings.
- Feed the faucet lines through: Lower the faucet body into position, guiding the supply lines and any sprayer hose down through the mounting holes.
- Secure it from below: Working underneath the sink, slide on the washers and thread the mounting nuts by hand first, then snug them with your wrench. Tighten until secure, but don’t overdo it — over-tightening can crack fittings or warp the gasket.
- Reconnect the supply lines: Attach the hot and cold lines to their matching shut-off valves. (Note: Most modern supply lines feature built-in rubber gaskets, so plumber’s tape is usually unnecessary. Only use tape if you have threaded metal-to-metal fittings without gaskets). Hand-tighten, then give them a final quarter-turn with a wrench.
- Handle pull-down or pull-out sprayers: If your faucet has one, attach the quick-connect hose to the supply line and let the counterweight hang freely underneath the sink — it needs room to move as the hose is pulled out and retracted.
Step 4: Turn the Water Back On and Test
Open both shut-off valves slowly rather than all at once — a sudden rush of water is more likely to expose a loose connection. Run the faucet through both hot and cold, then get down under the sink with your flashlight and check every connection point for drips. A slightly damp fitting usually just needs another small turn with the wrench.
Don’t consider the job finished after one check. Leaks around new connections sometimes take a few hours — or even a day or two — to show up, especially in fittings that seemed snug on the first pass. Glance underneath the sink over the next couple of days just to be sure everything’s staying dry.
Common Mistakes That Cause Leaks Later
A few missteps show up again and again in kitchen faucet installs, and they’re worth watching for:
- Reusing old supply lines or washers: They’re cheap to replace and far more likely to fail than the ones already sitting under your sink for a decade.
- Overtightening connections: More torque doesn’t mean a better seal — it often cracks plastic fittings or squeezes gaskets out of shape.
- Skipping plumber’s tape when needed: When connecting metal threads without built-in gaskets, skipping tape increases the odds of a slow leak.
- Rushing the job: Faucet swaps are simple, but simple isn’t the same as instant. Set aside a real hour rather than squeezing it in before you have to be somewhere.
- Ignoring corroded pipes or valves: If a shut-off valve won’t budge or looks corroded, that’s a sign of a bigger issue underneath — patching around it usually just delays the real fix.
When It’s Worth Calling a Plumber
Most straightforward faucet swaps — same hole configuration, working shut-off valves, no structural surprises — are well within reach for a confident DIYer. But there are a few situations where paying a professional is the smarter move:
- Shut-off valves are seized, corroded, or leaking on their own.
- You’re relocating the faucet to a new spot on the counter, which means running new supply lines.
- You need to drill new holes in a granite, quartz, or porcelain countertop.
- The supply lines are old galvanized or corrugated steel and look due for replacement anyway.
A professional plumber typically charges somewhere between $120 and $350 for labor on a standard faucet swap, depending on your region and how complicated the job turns out to be. Doing it yourself usually runs $30 to $150 in materials — mostly the cost of the faucet itself plus a basin wrench if you don’t already own one. For a job this manageable, that’s a meaningful amount of money to save on an afternoon’s work.
Frequently Asked Questions
How long does it take to change a kitchen faucet?
Most straightforward swaps take about 30 minutes to an hour. Add extra time if the old mounting nuts are corroded or if you’re also replacing the supply lines.
Do I need to turn off the whole house’s water supply?
Only if your sink doesn’t have its own shut-off valves. Most kitchen sinks have dedicated hot and cold valves underneath, so you can usually leave the rest of the house’s water running.
Can I put a single-handle faucet where a two-handle one used to be?
Yes, as long as you use a deck plate to cover the extra holes left behind. Just make sure the plate matches your sink’s finish and hole spacing.
What if my new faucet doesn’t match my old faucet’s hole spacing?
Check the packaging or manufacturer specs before you buy. Standard configurations are one, three, or four holes, and a deck plate can bridge most mismatches — but it’s much easier to check this before installation day than after.
Changing a kitchen faucet comes down to three things: shutting off the water properly, taking your time with the mounting nuts, and not skimping on new supply lines. Get those right, and the rest of the job is mostly patience. If you hit a stuck valve or corroded pipe along the way, that’s your cue to bring in a professional rather than force it — but for the average kitchen sink, this is a project you can absolutely handle yourself, and one that pays you back in avoided plumber’s fees every time.